函数名:sqrt_controller(开方控制器)
位置:libraries\AC_AttitudeControl\AC_AttitudeControl.cpp(1047行)
用途:经过改良的kp控制,当kp过大时,会呈现根号曲线,使响应变软1
_vel_target.z = AC_AttitudeControl::sqrt_controller(_pos_error.z, _p_pos_z.kP(), _accel_z_cms, _dt);
原函数1
2
3
4
5
6
7
8
9
10
11
12
13
14
15
16
17
18
19
20
21
22
23
24
25
26
27
28
29
30
31float AC_AttitudeControl::sqrt_controller(float error, float p, float second_ord_lim, float dt)
{
float correction_rate;
if (is_negative(second_ord_lim) || is_zero(second_ord_lim)) {
//二阶限制为零或负数 在这为 _accel_z_cms
correction_rate = error*p;
} else if (is_zero(p)) {
//p为0 在这_p_pos_z.kP()=1
if (is_positive(error)) {
correction_rate = safe_sqrt(2.0f*second_ord_lim*(error));
} else if (is_negative(error)) {
correction_rate = -safe_sqrt(2.0f*second_ord_lim*(-error));
} else {
correction_rate = 0.0f;
}
} else {//zing-note:正常进这个函数
float linear_dist = second_ord_lim/sq(p);
if (error > linear_dist) {//误差非常大
correction_rate = safe_sqrt(2.0f*second_ord_lim*(error-(linear_dist/2.0f)));
} else if (error < -linear_dist) {//误差非常小
correction_rate = -safe_sqrt(2.0f*second_ord_lim*(-error-(linear_dist/2.0f)));
} else {//正常状态
correction_rate = error*p;
}
}
if (!is_zero(dt)) {
return constrain_float(correction_rate, -fabsf(error)/dt, fabsf(error)/dt);
} else {
return correction_rate;
}
}
可以看出这个函数是在KP控制上加了一些限制,如果超过限制就做一些处理,如果没有超过限制,这个控制的效果就是普通的KP,
_vel_target.z=_pos_error.z*_p_pos_z.kP()
在物理上可以理解为这个KP=1/dt,所以这个算法可以认为是位置误差微分得到速度,这个思路在APM中被广泛应用。
那么经过限制后会有一个什么效果呢?最直观的方式就是把函数图像画出来,假设误差是从[-10,10]匀速变化,经过这个控制器在不同p值下的输出曲线。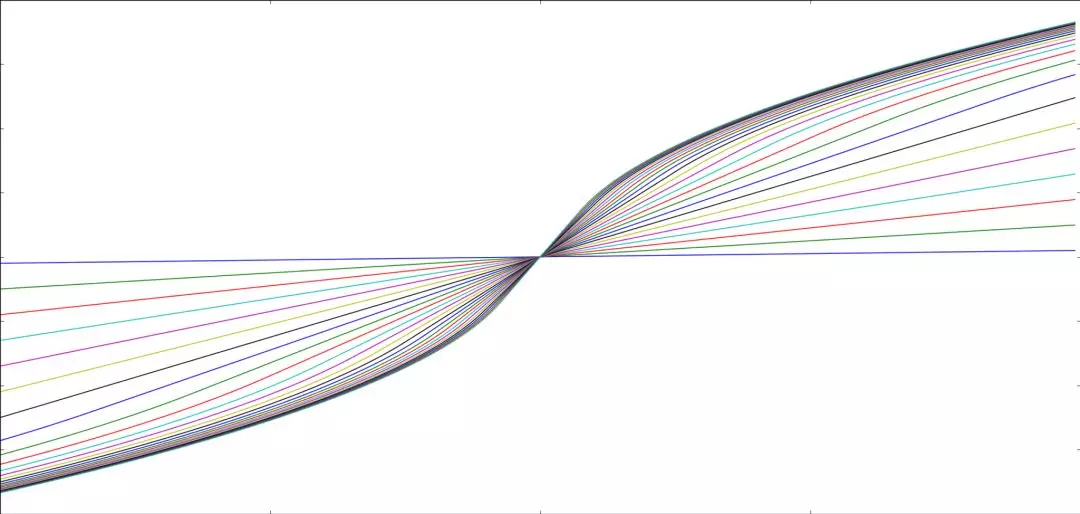
可以很明显的看出,在没有达到限制时,输出曲线斜率随着p值增大而变大,慢慢的限制要求达到,曲线慢慢逼近一条曲线,p越大输出越接近这条曲线,这条曲线类似于根号函数的曲线,所以这个函数取名为开方控制器。
这个控制器被广泛应用在APM的控制过程中,甚至是用在处理遥控器的输入信号,来控制遥控器的软硬程度,看的代码多了就发现,大家思路都差不多,区别就是这些不起眼的限制条件,先学习框架在学习细节,比如这个误差乘kp得到微分的思路你学会了吗?
函数名:lean_angles_to_accel
位置:libraries\AC_AttitudeControl\AC_PosControl.cpp
用途:倾斜角转加速度
原函数:1
2
3
4
5void AC_PosControl::lean_angles_to_accel(float& accel_x_cmss, float& accel_y_cmss) const
{
accel_x_cmss = (GRAVITY_MSS * 100) * (-_ahrs.cos_yaw() * _ahrs.sin_pitch() * _ahrs.cos_roll() - _ahrs.sin_yaw() * _ahrs.sin_roll()) / MAX(_ahrs.cos_roll()*_ahrs.cos_pitch(), 0.5f);
accel_y_cmss = (GRAVITY_MSS * 100) * (-_ahrs.sin_yaw() * _ahrs.sin_pitch() * _ahrs.cos_roll() + _ahrs.cos_yaw() * _ahrs.sin_roll()) / MAX(_ahrs.cos_roll()*_ahrs.cos_pitch(), 0.5f);
}
上次讲了加速度转倾斜角,不知道有没有人去思考倾斜角转加速度呢?
我们已知倾斜角,也就是已知旋转矩阵,使用该旋转矩阵,将机体坐标系下的加速度转换到地理坐标系下即可。
倾斜角转加速度的思路是一样的,假设当前飞机只受重力和旋翼产生的支持力,保持z轴平衡状态。
所以有:
其中$R_B^N$是机体坐标系转NED坐标系的旋转矩阵。
可得:
所以有:
因为$F_B$产生在NED坐标系下的加速度有:
所以:
至于最后为什么有个MAX,作者是这样说的
3 is dependent on there being a large lean angle and angle boost running. If we are in ACRO and at a large lean angle then you are probably holding altitude and the Fbz is probably closer to -mg/(cos_theta * cos_rho). Using the result of 3 will also have the effect of the aircraft going through the unconstrained acceleration part of the Fbz curve on it’s way to the low angle causing a large acceleration as it levels. So 3 is not a good option in general.
1 and 2 are reasonable and both will result in a good starting point. 2 will result in a twitch as you say but due to the acceleration limiting in most navigation modes 1 will to. In any case we have to limit the angle to something to prevent the cos terms going to zero so we need some version of 2.
For now I will leave it using the 2 version until we update the output of the navigation to a full 3D acceleration controller.
其实这个限制有三种情况,最终选择了第二种限制方法得到了现在的函数。
这个函数的讨论的全过程在
https://github.com/ArduPilot/ardupilot/issues/7267
可以看看这个最终函数是如何修改得到的。
看完姿态控制觉得姿态部分真的是代码的精华所在,以前只是走马观花的了解了大概真是浪费,之后的文章后把姿态控制进行详细的分析,来感受一下精华的魅力。
关注微信公众号,回复【姿态】即可获取画sqrt_controller函数图的python源码,同时欢迎加我的微信交流飞控心得,如果能转发分享那就更棒棒了。


